Everything you need to know about Starlink Satellite Internet in New Zealand
Starlink has now been available in New Zealand since March 2021 and has been embraced by users previously limited with slow ADSL broadband and people living in rural areas. In this article, we are going to go over everything you need to know about Starlink in New Zealand and more.
In summary, we will go over the following:
- What is Starlink?
- How does Starlink work?
- How to sign up for Starlink?
- What does the Starlink kit include?
- How to setup the Starlink Dish?
- What speeds can I expect?
- What we do?
- Starlink DIY Installations
What is Starlink?
Starlink is a satellite constellation operated by Elon Musks SpaceX and are built to deliver high-speed, low-latency internet across the globe. Starlink currently consists of around 1700 low earth orbit satellites, with the goal of having at least 42,000 in total. SpaceX already has the approval to place up to 12000 satellites in orbit and to date estimate that Starlink already serves 140,000 worldwide since its Beta tests started back in March 2021.
How does Starlink work?
Starlink satellites recevies the internet signal from one of many ground stations located across the planet. These ground stations have local internet access via fiber and intercommunicate a signal between satellites to reach range within your cell. A cell is simply the area of internet coverage one individual satellite can provide. Starlink then uses the satellite to transmit a signal to your home by use of a specific satellite dish used to receive the signal.
Check out our Starlink Satellite Tracker for a virtual representation if you haven’t already.
How to sign up for Starlink in New Zealand?
To sign up for Starlink visit Starlink.com. Currently, you can only order directly from Starlink.com
Orders placed with Starlink.com are sent from the USA and usually take up to ~2 weeks to be delivered.
UPDATE: Starlink and accessories are now available in-store from Noel Leeming.
At Starlink.com enter your address to confirm availability in your area, and if available you will have the option to order. Starlink often offer specials and deals and these are whats currently on offer:
- Own – NZ$159/mo for service and NZ$599 for hardware.
- Rent – NZ$79/mo for service, NZ$19/mo for hardware rental, and NZ$0 activation charge.
- Standard Service – NZ$159/mo for service and NZ$599 for hardware.
- Deprioritized – NZ$79/mo for service and NZ$599 for hardware.
If not yet available you will receive a message indicating what timeframe you can expect to become available and give you an option to pay a deposit of $159. Once available you will receive an email notification and give the option to pay the remaining amount. We recommend paying this deposit to ensure your place in the queue as these are manufactured on a “first come first served basis”.
UPDATE – The Gen 3 Dish is now available. More info on pricing and availability from Starlink.com
What does the Starlink Kit include?
Once you have received your dish it will include the following:
- The Starlink Dish
- 30 meter cable
- Mounting bracket
- Wifi Router (No Ethernet Adapter)
How to setup the Starlink Dish?
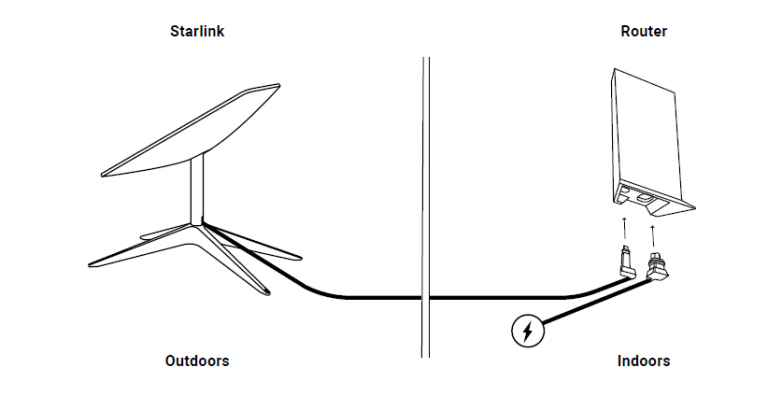
To set the Starlink Dish is super simple. Insert the Starlink dish in its mounting bracket and place it outside in a non-obstrcted area. The dish needs to see as much of the sky as possible. Simply plug the cable into the dish and into the Wifi Router as indicated in the following image. Next, plug the Wifi Router into your 230V plug and here we go!

Give the Starlink dish some time to power up and don’t try to manually move the dish into position as this dish is self-aligning and will automatically adjust its position.
Next, download and open the Starlink App. You can use the App and the camera on your phone to check for obstructions and confirm if you will have any issues.
If good to go, tap on the Start Setup button and follow the instructions to connect to the dish and set up your wifi network name and password. Once you have set this up, connect your phone to your new Starlink wifi network using the password you just setup.
Once connected, test your internet connection to make sure its active. You can do this by going to Trademe or Youtube and make sure it loads. To test your connection speed you can use our online speed test tool.

What speeds can I expect?
Once you have powered up your Starlink Dish, it can take 24hrs to settle in and stabilise your internet connection. Based on some of our installations throughout New Zealand you can expect up to ~250MB Download and ~50MB Upload speeds depending on your location and load of your cell. These speeds should increase over time as more satellites are added to the Starlink constallation. To confirm your Starlink Internet Speed please visit our Internet Speed Test Tool


What we do?
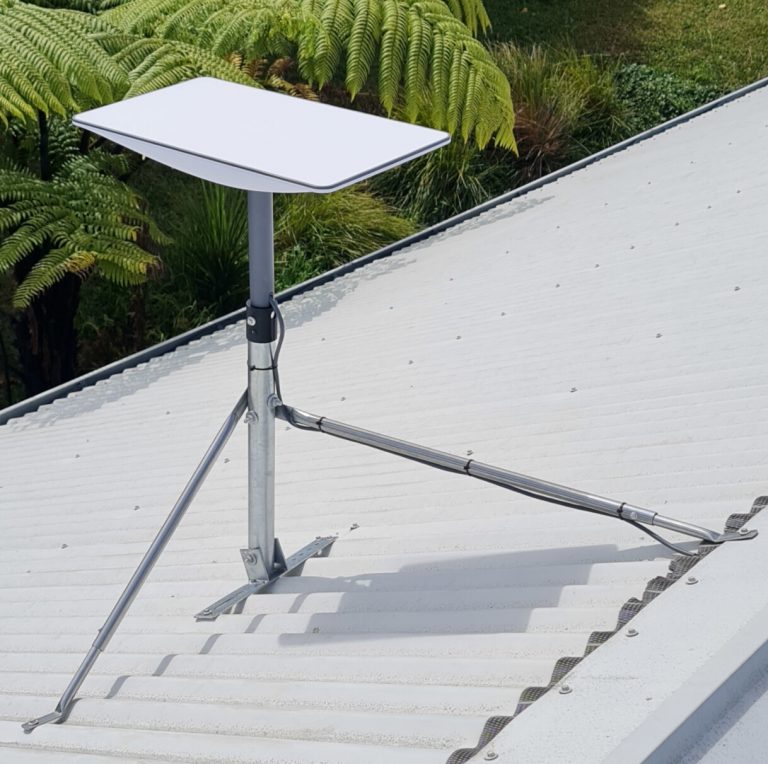
Starlink.co.nz specialises in Starlink Installations across New Zealand and operates mostly in Auckland, Wellington and Christchurch. As mentioned, when ordering the Starlink kit it will include a mounting bracket. The problem with this bracket is it’s intended for a basic temporary installation and raises the risk of being blown over in high winds and damaging the dish. We have also had customers who placed the dish on their lawn and had puppies and/or goats chew the cable and one instance of a wife reversing their car over the dish (true story).
We take this to the next level and permanently and securely install the Starlink dish to your roof or required location and neatly run the Starlink cable to its required location. Our Installers are experienced in Audio & Visual, Sky/Freeview and Security/CCTV installations and have a good understanding of how to run cables through your property neatly, and could possibly assist with an Electronic Security System or Digital Camera System if required.

DIY Starlink Installations
We have had a HUGE amount of handy customers install their Starlink dish themselves and after MULTIPLE requests we decided to make the bracket we use with our Starlink installations available here, and since sold HEAPS of these brackets worldwide.
Please visit our Shop for more info and to view our latest Starlink Gen 3 Roof mounts.
These roof mount brackets are typically used for Sky/Freeview dishes and we have adapted them to accept the Starlink dish. The bracket does require assembly and some tools for installation. These are not 100% fit and will have around 4mm gap to play with. We have now developed a custom pole mount adapter that comes included with our DIY Roof Mount Brackets and are a very snug fit.
Here are some pictures provided by our customers that have used our Starlink Roof Mount Bracket.
Conclusion
In this article, we discussed what Starlink is and how it has been used in New Zealand. It’s a great option if you currently live in a rural area or in a location with only access to slow ADSL internet. Its simplicity to install and setup can be done by the end-user and does not always require a professional installation to get the system operational, but for those who are unable to complete the install themselves have an option to contact us to provide a professional installation of your Starlink if required, and we look forward to working with you and this amazing product.
*Working at heights can be dangerous, with the risk of falls and serious injuries. Contact us to ensure a safe and professional installation, protecting yourself from potential harm.


